Leor Clinics : Pune's Expert in Skin, Hair & Body Treatments

Category: Uncategorized

  • Types of Pimples on Face: A Visual Guide

    Types of Pimples on Face: A Visual Guide

    Every pore on your face connects to a sebaceous gland that produces sebum. Because of this, facial skin remains especially prone to breakouts. When oil mixes with dead skin cells or bacteria, pimples form.

    Breakouts often bring frustration, especially before important events. However, you are not alone. Understanding the types of pimples on face is the first step toward clearer skin. When you understand your acne, you can treat it correctly.

    Understanding the Types and Causes of Pimples

    Your skin constantly communicates with you. Pimples often signal imbalance — whether due to oil production, bacteria, hormones, or lifestyle habits.

    Broadly, the types of pimples on the face fall into two categories:

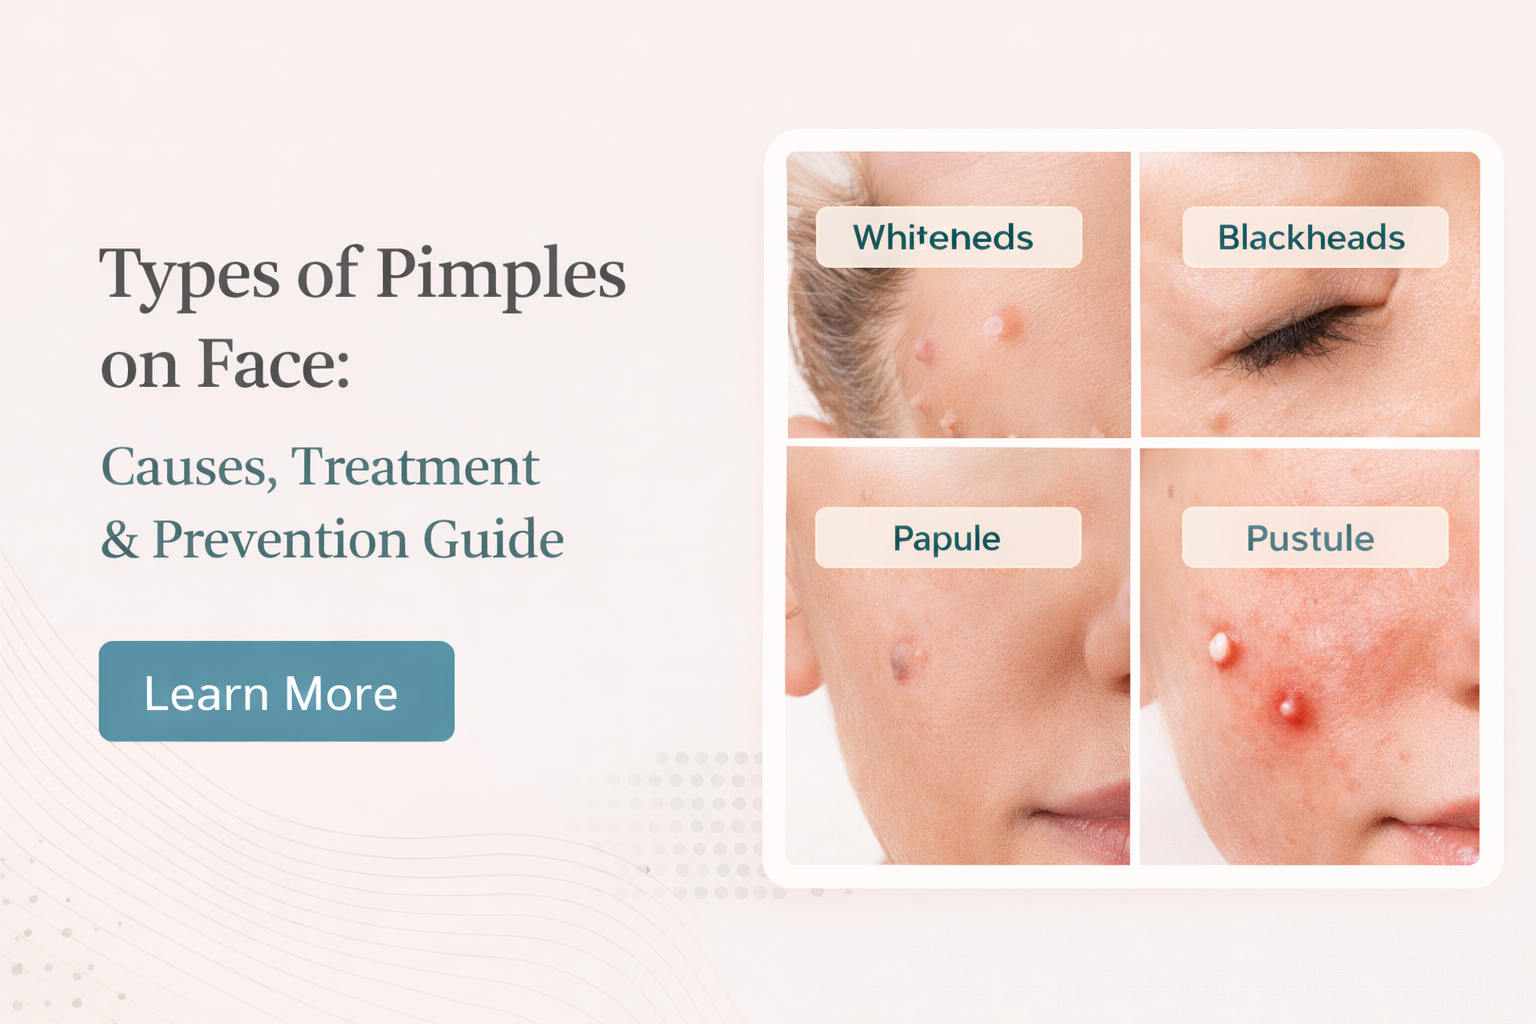
    i. Non-inflammatory Acne (Comedones)

    These breakouts do not hurt. However, they affect skin texture and clarity. They form when pores clog with oil, dirt, and dead skin cells.

    • Whiteheads: Closed pores filled with trapped oil and debris. They are common in oily and combination skin types.
    • Blackheads: Open pores filled with oxidised sebum. Contrary to popular belief, blackheads are not dirt. The dark colour appears due to oxidation.
    • Small pimples on face: These usually refer to comedonal acne. They often appear on the forehead, cheeks, and chin.

    ii. Inflammatory Acne

    Inflammatory acne appears red, swollen, and sometimes painful. These types of face breakouts often feel more distressing.

    • Papules: Small red bumps without pus.
    • Pustules: Inflamed pimples filled with pus. If irritated, they may leave acne scars.
    • Nodules and Cysts: Deep, painful pimples under the skin. These take longer to heal and often require professional care.

    Each of these kinds of pimples on face has a different cause. Some result from clogged pores. Others develop due to bacteria, hormones, or product reactions. Therefore, one single cream cannot treat every type effectively.

    Effective Treatments for Each Type of Pimple

    Different types of pimples respond to different treatments. Identifying your acne type helps you choose the correct solution.

    1. Over-the-Counter (OTC) Treatments

    For mild acne or early breakouts, OTC solutions may help.

    Salicylic Acid

    Unclogs pores and treats blackheads and whiteheads.

    Benzoyl Peroxide

    Kills acne-causing bacteria and works well for pustules.

    Niacinamide

    Reduces inflammation and strengthens the skin barrier.

    Retinoids

    Prevent clogged pores and fade post-acne marks.

    However, use these products carefully. Overuse may cause dryness or irritation. Consistency works better than aggressive application.

    2. In-Clinic Treatments

    Moderate to severe acne often needs professional care. Small bumps on face or recurring pustules respond better to deeper treatments.

    Chemical Peels

    Help exfoliate the top layer and reduce clogged pores.

    Q-Switch Laser

    Targets hyperpigmentation, acne scars, and certain active acne cases.

    Customised Facial Treatments

    Clinics like Leor Clinics tailor treatments to your skin type. These sessions combine exfoliation, hydration, and calming therapies.

    Severe cystic acne may also require oral medication or prescription retinoids.

    Treating acne is not just about removing pimples. It is about protecting your skin barrier and long-term skin health.

    How to Prevent Future Pimples

    Prevention requires consistency. Small daily habits make a big difference.

    Cleanse Gently

    Wash your face twice daily. However, avoid harsh scrubs. Over-cleansing weakens your skin barrier and triggers more oil production.

    Instead, choose a gentle cleanser suited to your skin type.

    Moisturise Daily

    Even oily skin needs moisturiser. Skipping hydration may increase oil production.

    Use a lightweight, non-comedogenic moisturiser to maintain balance.

    Watch Your Diet

    Although no single diet cures acne, patterns matter. High-glycaemic foods may trigger breakouts in some people. Dairy can also affect hormones.

    If flare-ups follow certain meals, observe and adjust accordingly.

    Manage Stress and Sleep

    Lack of sleep disrupts hormones and increases inflammation. Similarly, stress releases cortisol, which boosts oil production.

    Therefore, adequate rest supports skin recovery.

    Avoid Touching Your Face

    Picking spreads bacteria and deepens inflammation. Moreover, it increases the risk of pigmentation and scars.

    If needed, use spot treatments instead.

    Avoid Trend Overload

    Trying too many trending products confuses your skin. Instead, follow a simple and consistent routine tailored to your needs.

    Pimples: Do’s and Don’ts

    Do:

    • Patch test new products
    • Wash pillowcases regularly
    • Moisturise consistently

    Don’t:

    • Pick or squeeze pimples
    • Switch products frequently
    • Use harsh DIY remedies like toothpaste or lemon

    When Should You See a Professional?

    Persistent acne can affect more than just appearance. It can impact confidence and emotional well-being.

    Signs You Need Expert Help:

    • Acne lasting more than two months
    • Painful nodules or cysts
    • Recurring breakouts in the same area
    • Dark spots or scarring

    Risks of Ignoring Acne:

    • Permanent acne scars
    • Enlarged pores
    • Long-term hyperpigmentation

    Early intervention prevents long-term damage.

    Conclusion

    Effective acne treatment addresses both symptoms and root causes. Instead of suppressing breakouts temporarily, focus on restoring balance.

    Clear skin takes time. However, you do not have to navigate the journey alone.

    A consultation at Leor Clinics helps identify your type of acne. Based on that, specialists recommend suitable options — from peeling treatments for pimples to advanced in-clinic procedures.

    With the right guidance, healthier skin becomes achievable.

    FAQs

    Q1. How do I identify my pimple type?

    Observe size, texture, and pain level. Small pimples on face usually indicate non-inflammatory acne. Painful, swollen ones suggest inflammatory types.

    Q2. How to fix pimples on face?

    Start with gentle cleansing and targeted treatments. Persistent kinds of pimples on face may require professional care.

    Q3. Can ice remove pimples?

    Ice reduces swelling temporarily. However, it does not eliminate pimples completely.

    Q4. What type of pimple will not go away?

    Cysts and nodules often require medical treatment. Ignoring them may cause scars.

    Q5. How to remove pimple marks?

    Chemical peels and resurfacing treatments help fade pigmentation. Early treatment improves results.

  • CoolSculpting Before & After: Real Results

    CoolSculpting Before & After: Real Results

    CoolSculpting has become a popular choice for people who want to reduce stubborn fat without surgery. It uses a process called cryolipolysis, which means fat cells are frozen and gradually eliminated by the body. Many people are curious about how effective it is, what to expect before and after treatment, and how long results last. Read this blog to have a deep understanding around each stage involved in the process, the benefits, and some do’s and dont’s to keep in mind after treatment.

    What is CoolSculpting?

    CoolSculpting is a non-invasive medical treatment that removes small pockets of fat through controlled cooling. Its scientific name is cryolipolysis, which means “fat cell freezing.” In everyday terms, the procedure cools targeted fat cells to a temperature where they are damaged and eventually eliminated by the body’s natural processes. Skin and surrounding tissues remain unharmed when the procedure is performed correctly.

    The idea behind CoolSculpting began when researchers observed that repeated cold exposure could reduce localized fat. This insight led to the creation of devices designed to apply precise cooling to specific areas of the body. Modern CoolSculpting systems are cleared by major regulatory bodies and are widely used for body contouring without surgery, cuts, or anesthesia.

    During treatment, an applicator gently pulls the targeted tissue and delivers controlled cooling. Applicators are available in different sizes to fit various body shapes. Choosing the correct applicator and setting the right cooling level is critical for consistent cool sculpting results. Compared to liposuction, CoolSculpting requires little recovery time and carries fewer risks. It is important to understand that this is a body contouring method, not a substitute for full weight loss programs.

    Who is the Ideal Candidate for CoolSculpting?

    Many patients turn to CoolSculpting after trying to reduce stubborn fat through diet and exercise. Genetics, aging, and hormonal changes can make certain fat deposits resistant to traditional methods.

    Ideal candidates usually maintain a stable weight, have small areas of pinchable fat, and understand that results develop gradually. The treatment is not designed for large-scale fat reduction. Medical evaluation is essential. Conditions affecting circulation or cold sensitivity can make the procedure unsuitable. Providers also assess emotional readiness since the transformation occurs over several weeks or months.

    Experienced clinics explain that CoolSculpting is most effective for fine-tuning body shape rather than replacing weight management programs. They also document skin thickness and fat depth during the initial consultation to select the most effective treatment plan.

    Why Choose a Specialized Clinic For CoolSculpting?

    The success of CoolSculpting depends on more than just the equipment. Practitioner expertise, treatment planning, and attention to detail play a decisive role.

    Reputable clinics keep records of staff training, safety history, and patient outcomes. They regularly calibrate devices to ensure accurate cooling levels and use a method called treatment mapping. This mapping outlines which areas will be treated, how many cycles are required, and the expected results for each zone.

    Applicator selection is a technical decision that directly affects results. The wrong choice can reduce effectiveness or cause uneven contours. A good clinic prioritizes patient comfort, provides medical supervision during the procedure, and ensures that safety and consistency are maintained at every step.

    The CoolSculpting Before and After Experience

    What to Expect Before CoolSculpting Treatment

    A consultation involves a full-body assessment. The clinician measures fat thickness, takes photographs, and reviews medical history to confirm safety. The patient learns about the number of cycles needed, the expected timeline, and possible side effects such as numbness or swelling. Written aftercare instructions are provided.

    What Happens During the CoolSculpting Procedure?

    Preparation: The skin is cleaned and covered with a gel pad to protect it from direct cold. The applicator is positioned to match the body’s contours.

    Application and Cooling: The device begins cooling the targeted fat. Most people feel strong cold sensations for the first few minutes, followed by numbness. A light suction may help draw the tissue into the applicator. Treatment time usually ranges from thirty to sixty minutes per cycle.

    Monitoring and Comfort: Patients often read or rest during the procedure. Practitioners check comfort levels and tissue response throughout.

    Post-Session Care: The treated area is massaged immediately after to help the body process damaged fat cells more effectively. Most people return to normal activity the same day. Temporary redness or swelling usually fades within days to weeks.

    The Journey to Your Final Results of CoolSculpting

    Results build gradually as the body removes the frozen fat cells through its natural waste-clearing system. Noticeable improvement often appears as a clear distinction in the effects before and after of coolsculpting, which can be observed within three weeks, with the most visible changes between two and six months.

    Some clinics offer combined approaches. Patients may choose All Body Treatments that integrate CoolSculpting with other non-surgical options to achieve more complete contouring. The need for combination therapy depends on the individual’s goals.

    Benefits of Undergoing CoolSculpting

    Even with regular exercise and healthy eating, certain fat deposits tend to resist change. CoolSculpting offers a precise, non-invasive way to address these areas, giving people results that diet and workouts alone often can’t deliver.

    Targets only the fat you choose

    CoolSculpting uses controlled cooling to focus on fat cells without affecting surrounding tissues. The precision makes it suitable for shaping areas you’ve struggled to tone through diet and exercise alone.

    No downtime to plan around

    With no cuts or anesthesia, most people get back to their day immediately. Many even schedule sessions between errands or work hours.

    Results that feel natural

    Changes appear gradually over a few weeks, blending seamlessly with your body’s rhythm and making the transition look and feel natural.

    Lasting improvements

    Once treated you can witness the results in the fat freezing before and after, as the cells are gone permanently. Paired with a balanced lifestyle, the results can be long-term.

    Backed by a solid safety record

    Years of clinical use and FDA clearance add reassurance for those who prefer a proven treatment over newer, untested trends.

    A quiet boost in confidence

    For many, the real change isn’t just physical, it’s the renewed ease in clothing choices, posture, and everyday activities.

    Along with physical changes, patients often report improved confidence and satisfaction with their body shape. Maintaining a healthy lifestyle is essential for preserving these benefits.

    Areas We Treat With CoolSculpting

    Abdomen

    The coolsculpting abdomen before and after results often show a flatter stomach and a defined waist.

    Thighs

    Coolsculpting thighs before and after treatments demonstrate improved leg contour and balance between hip and knee.

    Arms

    The coolsculpting arms before and after effect reduces upper arm fullness, making sleeveless clothing more comfortable.

    Other treated areas include flanks, chin, back, and male chest. Proper applicator fit is vital for even results.

    Benefits of CoolSculpting Compared with Surgery

    While liposuction removes more fat in one session, it requires anesthesia, recovery time, and carries higher risks. CoolSculpting offers a lower-risk alternative with no recovery period, though it is best suited for smaller fat deposits.

    Conclusion

    CoolSculpting takes a very different route compared to traditional fat reduction methods. Instead of surgery or needles, it relies on a controlled cooling process that specifically targets fat cells. These cells gradually break down and are naturally processed by the body over time. This makes the treatment appealing to those who want visible coolsculpting before and after results without downtime. 

    Within the wider world of cosmetic treatments, CoolSculpting stands out for its non-invasive approach and ability to deliver natural-looking changes. In experienced hands, it becomes more than just a procedure, it is a step toward feeling more comfortable in your own skin. The choice of clinic matters greatly. Leor Clinics combines medical precision with a clear understanding of aesthetic balance and can help you achieve and see coolsculpting before and after stomach that looks natural and feels right for you. Contact us today to book an appointment and find out the scope of beautification we can provide to your body!

    FAQs

    Q1. How long do CoolSculpting results last?
    Ans: Results can last for years if a stable weight is maintained. Treated fat cells don’t return, but remaining fat cells can still expand with weight gain.

    Q2. What are the negatives of CoolSculpting?
    Ans: Temporary redness, numbness, or mild swelling can occur. Rarely, paradoxical fat growth happens. Choosing an experienced provider helps minimize risks and improve overall treatment satisfaction.

    Q3. Is CoolSculpting really worth it?
    Ans: For those close to their ideal weight seeking targeted fat reduction without downtime, CoolSculpting offers visible results. Its non-invasive nature makes it appealing compared to surgical alternatives.

    Q4. Is CoolSculpting permanent?
    Ans:The fat cells destroyed during treatment are permanently gone. However, lifestyle habits determine long-term results, as untreated fat cells can still expand if weight increases.

    Q5. How many inches does CoolSculpting take off?
    Ans:On average, patients may lose 1–3 inches from the treated area after several weeks. Final outcomes vary depending on individual body composition and number of sessions.

  • Laser Hair Removal Before & After: Smooth, Hair-Free Skin

    Laser Hair Removal Before & After: Smooth, Hair-Free Skin

    Unwanted hair often turns into a constant routine of shaving, waxing, or threading. However, these temporary solutions demand regular upkeep and frequently cause razor burns, ingrown hairs, and skin irritation.

    Laser hair removal offers a long-term solution. Instead of removing hair from the surface, it targets the root and gradually reduces regrowth. As a result, you experience smoother skin, fewer bumps, and less dependency on daily grooming.

    In this blog, you’ll understand how laser hair removal works, what to expect before and after each session, and how real transformations happen over time.

    Understanding How Laser Hair Removal Works

    Laser hair removal targets the hair follicle beneath the skin. Because hair grows in cycles, the treatment requires multiple sessions for optimal results.

    Let’s break the process down clearly.

    Step 1: The Consultation Process

    Every successful treatment begins with a personalized consultation.

    At Leor Clinics, specialists assess:

    • Skin tone
    • Hair thickness
    • Hair color
    • Treatment area
    • Medical history

    This evaluation helps determine the correct laser type and energy settings. Since laser parameters differ for various skin tones, customisation ensures safety and effectiveness.

    Moreover, the consultation sets realistic expectations. Your specialist explains session frequency, expected reduction, and aftercare guidelines.

    Laser hair removal is never a one-size-fits-all procedure. Precision matters.

    Step 2: How the Laser Targets Hair Follicles

    The laser emits a concentrated beam of light. The melanin (pigment) inside the hair absorbs this light.

    Once absorbed, the energy converts into heat. This heat damages the follicle and reduces its ability to grow new hair.

    Importantly, the laser targets active hair follicles only. It does not damage surrounding skin when performed correctly.

    Because different skin tones require different wavelengths, professionals adjust the device carefully. This ensures maximum follicle damage while protecting the skin.

    Step 3: Why Multiple Sessions Are Necessary

    Hair grows in three phases:

    • Anagen (active growth)
    • Catagen (transition)
    • Telogen (resting)

    The laser works best during the anagen phase. However, not all hairs stay in this phase at the same time.

    Therefore, you need multiple sessions spaced 4–6 weeks apart. Each session reduces hair thickness and density further.

    Although some regrowth appears between sessions, this is completely normal. Consistency delivers the best results.

    Laser Hair Removal Before and After: What Changes?

    Visible results happen gradually.

    After the first few sessions:

    • Hair grows slower
    • Hair appears thinner
    • Shaving frequency reduces

    After completing the recommended sessions:

    • Significant hair reduction becomes visible
    • Skin feels smoother
    • Ingrown hairs reduce
    • Pigmentation caused by shaving improves

    Before and after transformations often show dramatic differences in areas like:

    • Upper lip
    • Chin
    • Underarms
    • Bikini line
    • Legs
    • Full face

    However, results vary based on hormones, hair density, and adherence to sessions.

    Benefits of Laser Hair Removal

    Laser hair removal offers more than just hair reduction.

    1. Long-Term Hair Reduction

    Unlike waxing or shaving, laser treatment reduces hair production at the root. Over time, regrowth becomes finer and sparser.

    2. Smoother Skin Texture

    Repeated shaving often causes razor bumps and dark underarms. Since laser reduces ingrown hairs, the skin looks clearer and more even.

    3. Saves Time and Money

    Initially, laser treatment feels like an investment. However, you eventually save money on salon visits, razors, and hair removal creams.

    Additionally, you save hours spent grooming every month.

    4. Suitable for Multiple Areas

    Professionals can safely treat:

    • Face
    • Underarms
    • Arms
    • Legs
    • Back
    • Bikini area

    Because technicians adjust the settings, the procedure works across various skin types.

    5. Minimal Discomfort and No Downtime

    Most patients describe the sensation as a light snap or warm pulse.

    Modern laser systems include cooling technology. As a result, discomfort remains minimal. You can resume daily activities immediately after treatment.

    What to Expect Before and After Each Session

    Understanding the process reduces anxiety and improves results.

    Before Your Session

    Preparation matters.

    • Shave the area 24 hours before treatment
    • Avoid waxing or plucking for 4 weeks
    • Stay away from direct sun exposure for 2 weeks
    • Do not apply lotions, deodorants, or makeup on treatment day

    Following these steps improves laser precision and reduces side effects.

    Immediately After the Session

    You may notice:

    • Mild redness
    • Slight swelling
    • Warm sensation

    These effects usually fade within 24–48 hours.

    To soothe the area:

    • Apply cold compress
    • Use aloe vera
    • Avoid hot showers or intense workouts

    Avoid harsh skincare products on treated areas for a few days.

    Between Sessions

    Proper care ensures better results.

    • Use sunscreen daily
    • Keep the area moisturized
    • Avoid excessive sun exposure
    • Follow your treatment schedule

    If hormonal conditions like PCOS cause excess hair growth, discuss management options with your specialist for better long-term outcomes.

    Is Laser Hair Removal Permanent?

    Laser hair removal offers long-term hair reduction.

    While it significantly reduces growth, minor regrowth may occur due to hormonal changes. In such cases, occasional maintenance sessions help sustain results.

    Most patients require 6–8 sessions for optimal reduction.

    Conclusion

    Laser hair removal replaces temporary grooming routines with long-lasting smoothness.

    By targeting the hair follicle directly, it reduces regrowth, improves skin texture, and minimizes irritation. Over time, the results become clearly visible in before and after transformations.

    At Leor Clinics, specialists customize every treatment plan to ensure safety, comfort, and maximum effectiveness.

    If you are ready to experience smoother, low-maintenance skin, now is the right time to begin your laser hair removal journey.

    FAQs

    Q1. When will I see results?

    Most people notice hair thinning after 2–3 sessions. However, full results appear after completing 6–8 sessions.

    Q2. Is laser hair removal permanent?

    It provides long-term reduction. However, hormonal changes may require occasional maintenance sessions.

    Q3. Are three sessions enough?

    No. Since hair grows in cycles, multiple sessions are necessary for comprehensive reduction.

    Q4. Does laser completely remove all hair?

    It significantly reduces hair growth. Some fine regrowth may occur over time.

    Q5. Is the procedure painful?

    Most patients feel a mild snapping sensation. Modern devices minimize discomfort with cooling technology.

  • Pigmentation Around the Mouth: Causes, Treatments & Prevention

    Pigmentation Around the Mouth: Causes, Treatments & Prevention

    Pigmentation around the mouth, also known as perioral hyperpigmentation, appears as dark patches, uneven tone, or black marks around the lips and chin. Although it is not medically harmful, it can significantly affect confidence and overall facial harmony.

    In urban environments, especially, factors like pollution, sun exposure, stress, and hormonal fluctuations make this concern increasingly common. While home remedies may offer mild improvement, stubborn pigmentation often requires structured treatment.

    Let’s understand why it happens — and more importantly — how to treat and prevent it effectively.

    What Causes Pigmentation Around the Mouth?

    Pigmentation rarely appears without a reason. In fact, the skin around the mouth is thinner and more reactive, which makes it vulnerable to discoloration.

    1. Sun Exposure

    Firstly, UV radiation is one of the most common causes. When exposed to sunlight without protection, the skin produces excess melanin. Over time, this leads to visible dark patches around the mouth.

    Moreover, many people apply sunscreen to the cheeks and forehead but ignore the area around the lips. As a result, pigmentation builds gradually and becomes difficult to reverse.

    2. Hormonal Changes

    Secondly, hormonal fluctuations play a major role. Conditions such as pregnancy, thyroid imbalance, PCOS, or oral contraceptive use may trigger melasma.

    Consequently, this appears as patchy hyperpigmentation around the mouth and jawline. Women between 20–40 years are particularly prone to this type of discoloration.

    3. Post-Inflammatory Hyperpigmentation

    In addition, acne, rashes, allergic reactions, or even aggressive scrubbing can leave behind dark marks.

    This is known as post-inflammatory hyperpigmentation (PIH). Although the inflammation may heal, the skin “remembers” the trauma and darkens as part of its recovery response.

    4. Nutritional Deficiencies

    Interestingly, internal deficiencies can also show up externally. For example, Vitamin B12 or iron deficiency may cause unexplained blackness around the mouth.

    Therefore, if pigmentation appears without any obvious trigger, a simple blood test may provide clarity.

    5. Skin Irritation & Daily Habits

    Finally, repeated irritation weakens the skin barrier. Frequent lip licking, harsh shaving, fragranced cosmetics, or toothpaste contact can all trigger mild inflammation.

    Over time, this irritation results in gradual darkening.

    Professional Treatment Options


    Some skin stories run a little deeper than what a home remedy or a dab of aloe can fix. When the blackness around the mouth starts to feel like a shadow that won’t fade, professional treatments step in; not just to lighten your skin, but to bring back comfort and confidence. Below are tried-and-tested clinical methods that work for stubborn pigmentation around the mouth.

    1. Laser Treatments

    Lasers don’t just treat the surface; they dive deep into the skin’s pigment layers to target the root of hyperpigmentation concerns around the mouth. For those dealing with black marks around the mouth that have been around for a while, laser therapy can offer a noticeable difference.

    The process involves bursts of focused light energy that break down excess melanin. It’s precise, powerful, and especially useful for dark patches around the mouth caused by long-term sun exposure or hormonal changes.

    It’s not an instant fix, but many people feel a shift in how their skin behaves and looks after a few sessions. That said, this isn’t a treatment you walk into casually. Skin tone, pigment depth, and even emotional readiness matter, so a proper consultation is the first step, not the treatment.

    2. Chemical Peels

    Peels often sound scary, but in trained hands, they’re more like a reset button for your skin. Chemical peels work by removing dull, damaged layers and making space for fresh, even-toned skin to come through.

    If your mouth pigmentation looks darker than the rest of your face or if you’ve noticed blackness around the mouth after acne or sunburn, peels can smooth things out—both in tone and texture.

    The acids, like glycolic or lactic, are carefully chosen based on your skin type. These aren’t harsh DIY versions. These are skin-safe and effective when applied by a professional who understands how skin pigmentation really works.

    Over time, this treatment helps your skin bounce back, healthier, brighter, and far more even.

    3. Topical Therapies

    Sometimes the real change starts with a tube of cream, used night after night with a lot of patience and hope. Topical therapies are powerful allies in fighting hyperpigmentation around the mouth, if used correctly.

    Prescription-grade creams with ingredients like kojic acid, azelaic acid, or retinoids work quietly behind the scenes to fade black patches around the mouth. These are not miracle creams, but consistent application under expert guidance often makes more difference than people expect.

    How to Prevent Pigmentation Around the Mouth

    Some skin concerns sneak up on you. One day, your complexion feels even, the next — there’s a dark patch around your mouth you can’t unsee. While treatment options exist, prevention often saves both time and emotional effort. Preventing pigmentation around the mouth isn’t just about skincare; it’s about daily habits, awareness, and consistency.

    Let’s break it down into what you can actually do.

    1. Start With What Touches Your Skin Every Day

    Lip balms, shaving creams, toothpaste, or even your favourite snacks; your skin remembers everything. Some ingredients can trigger irritation or allergic reactions that turn into hyperpigmentation around the mouth over time.

    Opt for fragrance-free, non-comedogenic products, especially for the areas around your lips and chin. Patch-test new products on your wrist or behind your ear before applying them to the face.

    2. The Real Deal with Sun Protection

    Even five minutes under the sun without SPF can start the slow buildup of mouth pigmentation. UV exposure triggers melanin production, especially around sensitive areas like the mouth.

    A broad-spectrum sunscreen with at least SPF 30 should be a non-negotiable part of your morning routine, regardless of whether you’re stepping out or working by a window. And no, your lipstick or foundation with SPF 15 isn’t enough.

    3. Don’t Pick, Pop, or Over-Scrub

    The skin around your mouth is thinner and more reactive. Every time you pop a pimple or aggressively scrub to “clean” the area, you risk inflammation, which leads to post-inflammatory hyperpigmentation around the mouth.

    Gentle care is your best friend here. Use mild exfoliants only 1–2 times a week and avoid harsh tools or physical scrubs.

    4. Maintain Blood Sugar and Hormonal Balance

    Internal health plays a surprisingly big role in how your skin behaves. Conditions like insulin resistance, PCOS, or thyroid imbalances can show up on your skin as black patches around the mouth or jawline.

    Regular checkups, balanced meals, and avoiding excessive sugar intake can support skin health from within. If pigmentation is persistent despite topical care, it might be time to look inward.

    5. Keep the Area Hydrated and Nourished

    Dry, under-nourished skin is more prone to becoming pigmented—especially around the folds of the mouth. Apply a barrier-repairing moisturiser twice daily and ensure the area stays protected against environmental stressors like pollution or wind.

    Ingredients like niacinamide, ceramides, and hyaluronic acid can help the skin stay plump and resistant to darkening.

    Conclusion

    Dealing with pigmentation around the mouth often starts with understanding where it comes from. And once you know the cause, it becomes easier to manage.

    Home care helps to a point, but not all darkness around the mouth remedies work the same for everyone. That’s why some cases need structured treatments like laser sessions, chemical peels, or dermatologist-approved topical therapies.

    The key is to be consistent with skincare, protect your face from the sun, and avoid products that irritate your skin. Spotting the early signs of black patches around the mouth or any kind of mouth pigmentation allows for faster recovery and less stress.

    Hyperpigmentation around the mouth may be stubborn, but with the right care, it’s not permanent. If pigmentation around your mouth has been bothering you for a while, it’s time to stop guessing and start treating it right. At Leor Clinics, our skin experts offer personalised solutions from Glow Facials adjusted for your skin’s unique needs.

    FAQs

    Q1. How to get rid of pigmentation around the mouth?

    Ans. Treating pigmentation around the mouth involves a combination of targeted skincare, professional treatments like chemical peels or laser therapy, and strict sun protection. Dermatologist-guided care ensures deeper hyperpigmentation around the mouth treatment with long-lasting results over random home remedies.

    Q2. Why does pigmentation around the mouth occur?

    Ans. The cause of pigmentation around the mouth often includes sun damage, hormonal imbalance, post-acne marks, and even lifestyle habits like smoking or excessive licking. This leads to darkness around the mouth, black patches, and stubborn hyperpigmentation that may worsen without timely intervention.

    Q3. What vitamin deficiency causes hyperpigmentation around the mouth?

    Ans. Deficiency in Vitamin B12 is commonly linked to blackness around the mouth or a dark area around the mouth. Low levels disrupt melanin production, causing uneven skin pigmentation. Regular testing and supplementation can support other treatments for darkness around mouth effectively.

    Q4. What is the fastest way to cure hyperpigmentation?

    Ans. The fastest results for pigmentation around the mouth treatment come from clinic-grade options like laser treatments and chemical peels. These penetrate deep into pigmented layers and work faster than over-the-counter creams. Dermatologist-prescribed care ensures better outcomes for stubborn mouth pigmentation issues.

    Q5. Is vitamin C good for hyperpigmentation?

    Ans. Yes, Vitamin C is widely used in topical therapies for fading dark pigmentation around the mouth. It helps reduce melanin production and brightens the skin. For visible improvement, pair Vitamin C with professional treatments like glow facials or peels under expert care.

  • Hello world!

    Welcome to WordPress. This is your first post. Edit or delete it, then start writing!